
Find Fishing Spots with Google Earth
- Sep 7, 2022
- 6 min read
Updated: Sep 29, 2022
If you're a lover of the outdoors there's a good chance you already know about Google Earth.
But... did you know that Google Earth can be used to help you find high percentage fishing spots right from the comfort of your own home?
It's true.
Thanks to the downloadable software version, Google Earth Pro, one can easily identify overlooked fishing spots without even being on the water.
Below we'll run through how this amazing tool can be used to give you the upper hand on the fish and other anglers for all your future fishing trips!
Download Google Earth Pro
First thing is first - download Google Earth Pro on your computer or laptop.
It's free!
You will need the computer desktop version of Google Earth Pro because of it having a specific feature that allows you see imagery from different times in history.
This will all make sense later - we promise. Moving onto the basics...
The Basics of Google Earth Pro
Google Earth Pro can be complex but thankfully for an angler it doesn't have to be.
Below are a few of the basic tool bar features that you need to be aware of before finding new fishing spots.

#1 The Placemark
If you are someone who has a fishing unit with GPS (Navionics, etc.) then this is a tool you will want to get acquainted with.
You can access it by clicking on the Placemark icon on the tool bar.
Note: When using this tool the tip of the pin is the location you are marking, NOT the center of the box that the pin is in.
#2 The Historical Imagery
The is the most important feature you will use. The historical imaging feature gives you a timeline of moments in history where geospatial imaging was captured for a specific region.
You can access it by opening up Google Earth Pro on your computer and clicking on the Historical Imagery icon on the tool bar.
You will see a timeline pop up in the upper left part of the screen that now lets you pick a time in history to view a region of interest.
#3 The Ruler
There may be particular spots of interest where you will want to know the distance between point "A" and "B". This is where the ruler tool comes in.
The ruler is super helpful when trying to figure out how long a lake point is or the distance you may need to travel from the boat ramp to a fishing spot.
You can access and use this feature by clicking on the Ruler icon on the tool bar.
There are multiple units of measure so make sure you are using your preferred method (meters/yards/etc.).
Here's the good news - That's pretty much the only tools you need to know how to use to find and mark your next fishing spots!
Choosing Your Path Forward
There are two approaches when using Google Earth Pro to your fishing advantage and it's really all based on whether you have a fishing unit that incorporates GPS navigation (Navionics, lake maps, etc.) or not.
The first method will assume you don't have a GPS card whereas the second method is a video from Fish The Moment that breaks down how to mark waypoints and get your Google Earth Pro waypoints loaded into your fishing electronics.
Which one are you...
No, I don't have fishing electronics with GPS = Method 1
Yes, I have fishing electronics with GPS = Method 2
Method 1: Just Google Earth.
Getting Familiarized and Set Up
Start by opening up Google Earth Pro on your computer as well as another internet tab of Google Earth.
If you don't already have a Google account that you sign in with you may want to create one. The Google Earth web version is where you will be creating your waypoints.
Since Google Earth Pro is only for computer desktops the internet Google Earth link helps us get away with still having waypoints that can be accessed using a smart phone while on the water.
Once you have both Google Earth Pro and Google Earth open you're ready to start finding fishing spots!
Start by zooming in on your fishery and running through the different historical points to determine which points in time have the best clarity, clearest water, etc.
If your fishery has a point in time where the water levels are lower than normal that's even better!
The goal here is to have at least one or two historical imagery dates with either clear water or lowered water levels that let you really see what's below the surface.
To give you an example, the below picture shows three different points in time of the same area of a lake.
The first picture is from the year 2021, the second from 2017, and the last was the lake at its lowest captured point in 2002.


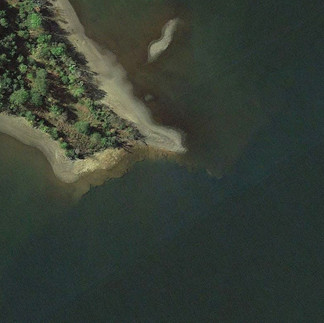


Thanks to the captured imagery, Google Earth Pro allows you to easily see this steep underwater drop off just off the edge of the lake point!
Amazing, right?
How to Mark Waypoints in Google Earth
Once you've found some spots of interest on your own fishery, use the below steps to start creating and saving some waypoints.
Step 1: Create a Project
On your Google Earth web page click the Project Icon on the left tool bar and then click "New Project" and name your project.
This is where you will be saving all your waypoints.

Step 2: Create a Waypoint
Hopefully by now you've identified a place of interest on Google Earth Pro.
Zoom into your fishery so that you have a side-by-side view of Google Earth Pro and Google Earth.
This is needed because of the Google Earth web version not allowing you to back track in time to historical images.
The below photo shows a side-by-side comparison to give you an idea.
The left photo is Google Earth Pro at a point in history that allows us to see a long, tapering point and the right photo is the current Google Earth image.
Without Google Earth Pro you would never know this long, tapering point was there.


Using the historical imagery from Google Earth Pro, you can now go to your Google Earth web page and make waypoints of the beginning and end of this point (see below).
Simply click on the waypoint icon (bottom left of below picture) and mark the spot.
You will be asked to give it a name as well as what project you'd like to save it to if you haven't done so already.

Just like that - you've marked an area of interest that may hold fish that you never would have known about before!
After creating your points of interest, you can take things a step further using the ruler tool to know exactly how long a lake point is, how far from the bank a brush pile is, and so on.
Repeat this process for every area of interest (points, vegetation, brush piles, rocks, etc.)
Before too long you'll have an entire lake worth of waypoints similar to the picture below to use for your next trip or tournament!

Step 3: Accessing Your Project from Your Phone
Now that you've done your homework on your local body of water you will need to make sure your hard work is available to you when on the water.
Just like how you signed in from your computer, do the same from your phone by going to Google Earth in your web browser or by using the Google Earth app.
Sign in using the same Google account associated with your fishing waypoint project and then click on the Project icon again on the left.
You should see the project name that you created in the above steps that houses all your fishing areas of interest.
Click on the project and you're all set!
Make sure your phone GPS is turned on so that you know exactly where you are in relation to your waypoint and have fun fishing your newly created points of interest!
Method 2: Marking & Transferring Waypoints to Your Electronics
Rather than reinventing the wheel, the below video by Fish The Moment will tell you all you need to know about how to mark your waypoints and get them to your fishing electronics for your next trip!
Below is a list of timestamps throughout the video to help guide you through the process...
0:37 - Downloading Google Earth Pro
1:48 - Introduction to historical imagery
3:20 - Marking points of interest
9:26 - Converting points of interest to the appropriate file format
14:23 - Items needed to perform transfer to fishing electronics
15:30 - Digital guides by Fish The Moment for specific electronics
Time to go catch em'!
This can be a confusing topic for some. If you happen to have specific questions on how to use Google Earth or Google Earth Pro to your fishing advantage feel free to reach out!
Connecting with us is easy!
Go to the Home Page
Subscribe so you never miss an article
Respond to the subscriber email with your question


Comments